This review page is supported in part by the sponsors whose ad banners are displayed below |
 |
 |
|
 |
This is a comprehensive and thus very lengthy report in nine chapters. For ease of access, there are links to each chapter - Ed.
|
 |
Writer: Mike Malinowski
Financial Interests: click here
___________________________________________________________________________________________________
Chapter 1: Introduction - General overview; room sizing issues; photos of rough-out stud construction.
Chapter 2: Specific room construction issues - Electrical; Equi=Tech 10WQ power unit; balanced power theory; installation of the Equi=Tech; lighting; HVAC; general room design; equipment rack location; initial speaker setup in untreated room.
Chapter 3: Layman's introduction to acoustics - Universal problems; wide dispersion speakers and first reflections; reverberation; comb filters; standing waves; slap echo; resonant room modes; parallel vs. non-parallel walls.
Chapter 4: ASC room design - Acoustic goals; various ASC options and blueprints; short ASC history.
Chapter 5: Wall systems - ASC IsoDamp; ASC Wall Damp; theory; installation photos.
Chapter 6: Assembling and setting up the Wilsons.
Chapter 7: The MATT test - ASC's and Overture Audio's role during on-site testing; ASC MATT tests; MATT theory.
Chapter 8: The tube traps - Physical design; theory of operation; final room design; installation of the tube trap system.
Chapter 9: The sound and summary
___________________________________________________________________________________________________
|
Chapter 1: Introduction. It has been an amazing trip. Never in my wildest dreams did I imagine having the opportunity to build a custom listening room from scratch. Having been fascinated by the world of electronics and audio since the age of three, the construction of a dream room for listening was the culmination of a lifelong desire. The real project actually was the building of a house - but the house was literally designed around the listening room.
This did not begin as a review project. As construction progressed, I simply realized that after 30 years of being an audiophile, there was much I didn’t know yet especially in the world of acoustics. I love to learn and during the process read everything I could get my hands on, from The Master Handbook of Acoustics to on-line posts. I then talked to friends and people in the industry and developed some hands-on experience and knowledge. With this report, I would like to share the story of my journey and some insights I gleaned during the construction. Of course some design elements are specific to my room but much of it is universal and some of my successes and failures will hopefully entertain and enlighten others who face similar prospects. By the way, this room was not built with review samples or products provided for this purpose by the manufacturers. It was a real-life quest from the perspective of a real-life regular audio Joe - albeit a crazed one. |
|
|
The beginning. Looking back, it’s amazing how our obsessions seem to be almost genetically predetermined. My earliest childhood memories are of radios and vacuum tubes. With friends and relatives involved in electronics, I was immersed and captivated early on. For some children their passions were art, music or medicine, for me it was audio. Life is quirky.
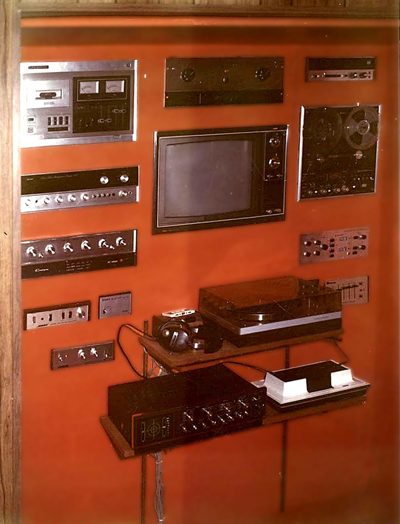
Saving up money from summer jobs, my junior high stereo became the hit of the ‘hood. How many 13-year olds owned AR3as in suburban Philadelphia? Normal kids had tacked up photos of cars, movie stars or black light posters. My bedroom walls were filled with audio equipment [above].
For some inexplicable reason, possibly due to being a spoiled only child, my parents let me take over half the basement of their modest suburban rancher and build a real listening room. It was a labor of love I worked on continuously after school for many months. Wood paneling, orange shag rugs, black lights… it was the quintessential 70s’ den. For a teen, the equipment was quite outrageous. Do you know just how many lawns I had to cut to afford new Bose 901s powered by a Crown DC300 amp and IC150 preamp? A lot! I had the biggest baddest sound system in town.
As an adult, the progression never ended, from Dahlquist DQ10 to Acoustat, Thiel, Linn, Wilson and everything in between. In good times and bad, the passion never waned. The evolution continued with the purchase of a nice suburban home with an empty basement. But as with many basements, the 8’ ceilings and constraints of existing HVAC, poles and stairs limited the design.The room had spectacular sound and provided my wife and I with countless hours of musical enjoyment. But the upgrade itch never left. Having moved to the Wilson X-1s, I wondered how they would sound in a larger well-treated room. What if I had space where the speakers could bloom and breathe and the walls would just disappear? For 16 years it was just a dream. What if.
|
 |
Finally living the dream |
Although we were quite content with our house, my wife and I would drive around during the weekends just for fun, stopping at new housing developments to dream and collect design ideas. As we headed to empty nester status, we stumbled upon a new house design that captivated us to informally begin a land search. Large rural land tracts in the suburbs of Philadelphia are becoming rare due to existing development and open-space conservation initiatives. Amazingly then, we found our piece of heaven. Stumbling by chance onto a beautiful piece of property on a hill top was a rare opportunity and thus began our multi-year journey that ended with the christening of our new dream house and more importantly, our new sound room.
Whether you're buying or building, you must prioritize. Other than Bill Gates & Co, there will be compromises. We set out on each floor to find one area of personal importance - master bedroom for the second floor, kitchen on the first and last but not least, the dedicated stereo room on the lower level. One of our design goals was that the listening room would be a dramatic upgrade to its predecessor. What card-carrying audiophile would build a house from scratch and not upgrade the listening room? The dream was wonderful, getting there a logistical nightmare.
|
 |
The old room |
Building a house from scratch is assembling a complex puzzle. Each part is unique and must interlock with the next to ultimately form the whole. Mess up one or two key pieces and it just won’t come together. This project was a once-in-a-lifetime event. To be honest, I’m not sure I’d have the beans to do it over again. We began the process in mid 2007. The first step was to bring the builder to the old house, show him my current listening room and hope he’d understand our obsession. As a lover of music, he immediately grasped my passion as I began to lay out some of the crazy construction requirements for the new room. He chuckled, didn't flinch and said, “Have no fear, we can make a battleship fly!” Thus began a great relationship.
|
|
|
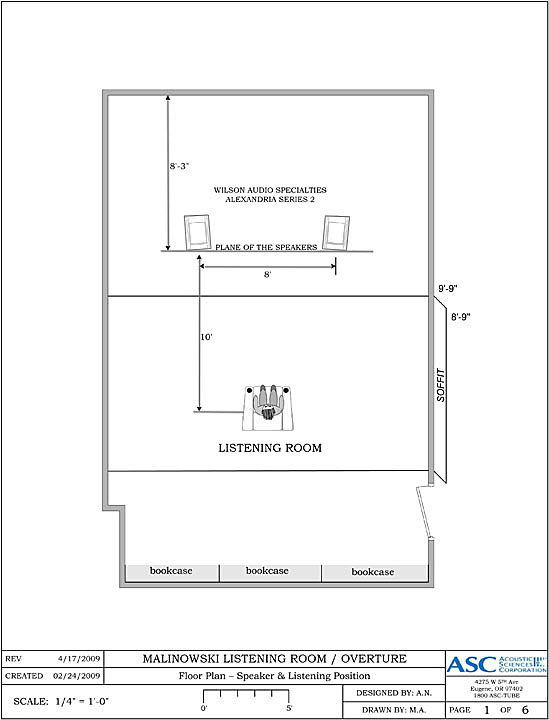
The design. We’ll get into some discussions about room size later but here are some truisms. One is that room size does matter. In general, larger rooms will be easier to treat acoustically and have more evenly spread out resonant modes. Second, the sound in a properly set up larger room will have a chance to bloom and envelop the listener with a deeper low end whereas a smaller room generally offers more of a headphone effect. Wanting the largest possible space, there were two available areas. One was a large sunroom with a vaulted ceiling. However, with windows covering about 70% of its walls and hard tiles on the floor, it probably would not have made good sound. Also, it was to be a sun room. This would not have worked too well if we moved it below ground. That left the basement as the only listening room option. The initial goal was a largish room of approximately 6,000 ft³ so I started with a 30 x 20 x 10 foot footprint. Yes, I understand ‘bad’ ratios whose length and width are divisible by the height to give lumpy uneven sound but this was a general starting point and I had to be realistic within the overall house design. The problem was not square footage but height. Traditional basement ceilings are the repository for beams, HVAC ducts, plumbing and electric conduits which can severely limit usable height. After playing some formulae, I quickly realized that I was not going to build the room according to a golden ratio of 1 x 1.6 x 2.6. Yet as we’ll see, not all was lost. There is a lot more to good room sound than strict adherence to a single ratio - and a lot of other things to worry about.
|
 |
In most homes, a basement is chopped up into rooms designed around the main support metal posts, I-beams, HVAC, plumbing, heating, electrical and duct work. Carve out a little room, drop in the ubiquitous home theater, throw a pool table in an open area and you have a finished basement. When your design revolves around a single room however, you encounter some interesting obstacles. First, the room had to be a clear span. The vertical support posts which often appear somewhat randomly throughout every basement would not be tolerated. Then there was the issue of height. For the smoothest bass response, increasing the square footage of the floor space required a proportional increase in height. I ultimately ended up with ten-foot ceilings in the basement but only nine and eight foot ceilings in the remainder of the first and second floors. Not many homes have their highest ceilings in the basement. This was just the first of many odd building requests at least by traditional standards.
|
 |
When you're building a house, you might control the design of the first and second floor with the exception of a few load bearing walls to have significant freedom. The basement is different. You don't own it, the subcontractors do. The electric, plumbing and HVAC installers will all lay absolute claim to the basement as their domain. Sometimes it's for pure convenience on their part, at other times for more substantive reasons. Typically once a custom house is enclosed, the various mechanical tradesmen spend a few days designing and planning for the location of the various equipment, plumbing, wiring and ducts. On one of these planning days, I got a somewhat panicked call from the builder stating that the HVAC company had determined that the only logical location for two of the heating and air-con units was smack in the center of the listening room. They needed the geographical center of the house for the main feed trunks. To them no bends, clean airflow and easy access were all perfectly logical. Due to foundation plumbing, window locations and other obstacles, moving the heaters was difficult if not impossible. It took a staircase redesign to solve the problem. It allowed us to carve out a small HVAC closet. Crisis solved.
|
 |
A larger problem loomed as the listening room spans almost the full width of the house. The main trunks for the HVAC and returns had to cross into and through the listening room to feed the first floor or else, no upstairs HVAC. My wife has a pretty good sense of humor and is very supportive of this crazy hobby. But she would probably have drawn the line at an unheated house. Kicking and screaming, I ended up with a one-foot soffit in my listening room ceiling as a design compromise. Since the soffit was required, I took full advantage by stuffing it with all the plumbing, wiring and anything else that had to cross the room. This allowed the remainder of the ceiling to remain as high as possible and kept noisy electric cables out of the walls and away from the audio chain.
|
 |
Major glitch number two was the main sewer pipe. Unfortunately fluids don't flow uphill without expensive pumps. Based on the septic system design, the only possible location for the sewer pipe to exit the house was through one of the listening room walls. The plumbing contractor proposed hanging the primary sewer pipe in the middle of the room. That led to compromise number two, a small six-inch bump out in the corner. This was aesthetically innocuous and sonically benign.
|
 |
In slightly more than one year, I finally had a finished shell of a room but it would take almost another year to turn it into a world-class listening space. So this was just the beginning. The next chapters will detail the entire process including room design, lighting, Equi=Tech balanced power, speaker setup, acoustics, ASC IsoDamp wall system, ASC MATT testing, tube trap theory, system installation and of course the sound of the room.
|
 |
|
|
|
|
|
| |
 |
 |
 |
|