This review page is supported in part by the sponsors whose ad banners are displayed below |
 |
Tube trap Design: What are those monolithic cylinders and what do they actually do? Remember the discussion on room modes? That’s where the tube traps shine. From ASC: "The tri-corner of a room acts to transform and compress all of the acoustic energy in a sound wave into pure pressure fluctuations. Tube traps are designed to take full advantage of the acoustic pressure zones created in the corners of a room. They convert the pressure changes into air movement within the dense walls of the tube trap. Through regulated friction in the walls of the tube trap, energy is damped out of the wave."
While that sounds nice, even some knowledgeable audiophiles believe that tube traps are nothing more but the acoustic equivalent of overstuffed absorbent furniture. I’ve found that the reality of physics is very different from that perception. Tube traps are more analogous to a capacitive/resistive electric circuit than an overstuffed pillow. The tube trap is deceptively simple and elegant. It is essentially a rigid sealed fiberglass cylinder. Key are fiberglass density and thickness. As a sealed device, air is trapped in the center of the tube trap. In each room corner occur large pressure fluctuations due to acoustic energy collecting at wall boundaries. This produces a difference between the pressure inside and outside of the tube trap. At room boundaries, the bass wave is converted to pressure differentials. If there is higher pressure on the outside than inside of the tube trap, equalization will occur. Air will move from the high-pressure to the low-pressure zone, basically forcing its way through the fiberglass into the tube trap. For the air to get inside the tube trap it must pass through the semi-rigid fiberglass requiring work and energy.
|
|
|
The process of equalizing the pressure gradients dissipates bass energy by transforming it to heat due to friction of air against individual glass fibers. Type and density of the fiberglass are critical – too loose and the sound will pass without removing energy, too tight and the sound will reflect back into the room. Properly designed tube traps effectively dampen, control and eliminate excess bass energy by heat dissipation. It's simple, elegant and really ingenious.
Many self-professed audiophiles—including until recently myself—really do not possess a full understanding of what goes on inside their listening rooms. Every room including yours has resonance modes. "A bass note that matches one of the room’s resonance node frequencies will have a very boomy and long decaying sound. When the bass note matches a non-resonant room frequency you end up with a very rapid decay note followed by the resurgence of the sound to within 10dB of the original level." Amazingly—and this is really important—the actual frequency of the reflected sound is changed resulting in a dramatic coloration with a profound impact on listening. As we all go to extraordinary lengths to tweak our systems via seeming insanities like special cables, risers, magic dots and countless dollars in equipment, without acoustic treatment the sound is wrong. It might be enjoyable and somewhat pleasant but it's not accurate and it's not what's on the recording.
|
 |
 |
The attack, decay and natural reverberation of music deliver the subtle clues to our ears which allow us to perceive delicacies in the soundstaging and textures in the music. Acoustic studies have shown that untreated rooms alter the frequency, attack and decay of the reproduced music. With bass trapping, the decay times of resonant frequencies are reduced and conversely non-resonant decay times are increased, with bass boom reduced or eliminated. On the other end according to ASC, "it's been long established that the phase shifting of components of a complex musical tone is not discernable for the steady-state condition" while phase shifting of the lead attack transient is easily heard. On the attack side, the direct sound from the speaker combines with the reflections forming a composite waveform that contains phase distortion and amplitude distortion to result in image-position jitter. By eliminating the initial reflected sound, the traps correct both attack and decay problems, allowing subtle details to emerge along with a new-found clarity of musical complexities.
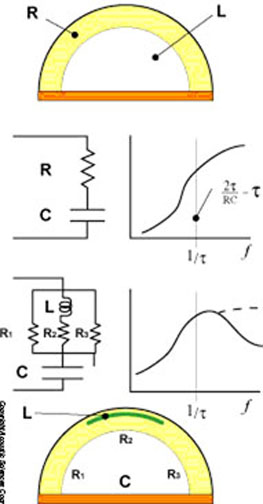
For those technically inclined, using the electric circuit analogy Art explains that "unlike any other bass trap, the physics behind the TubeTrap are based on a capacitive/resistive circuit. The acoustic capacitor (C) is the air chamber inside. The bigger it is, the more efficient the TubeTrap is at low frequencies. The acoustic resistance (R) is DC impedance matched to the radiation (LC) impedance of a freely radiating sound wave. Because of this design feature, the TubeTrap is more than 100% efficient. Another unique feature is the adjustable diffusion grid built into the TubeTrap. The specular diffusion panel that covers half of the TubeTrap is an acoustic choke (L) which is sized, ported and mass-loaded to backscatter the treble range."
|
|
|
|
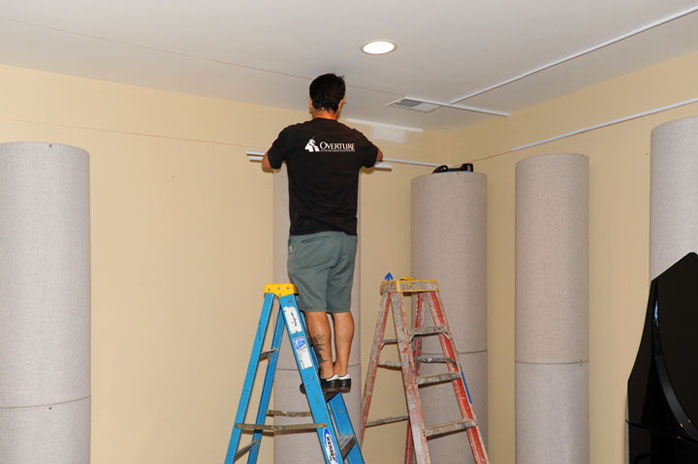
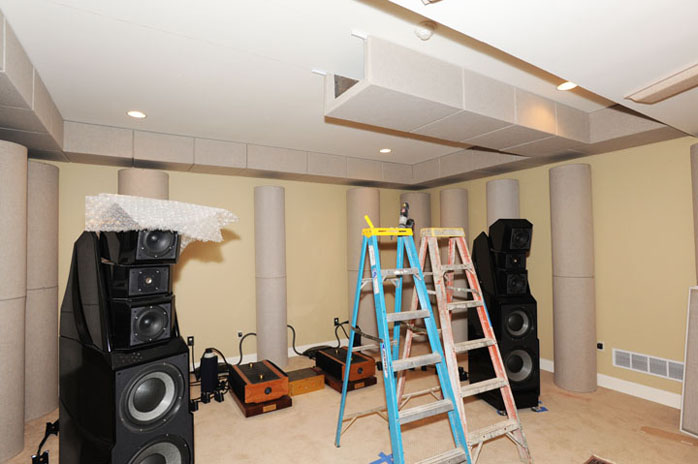
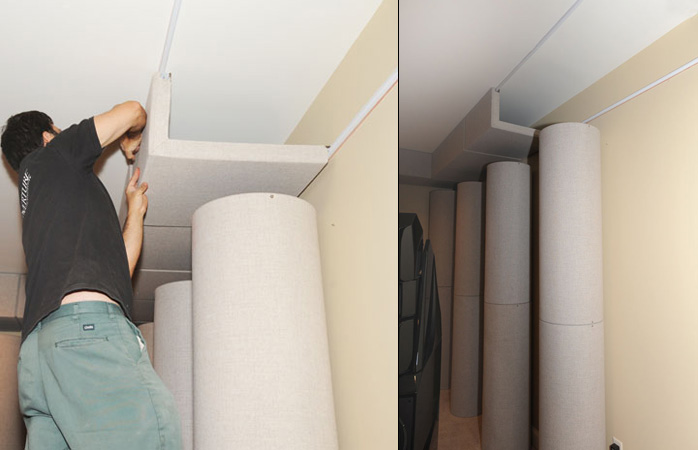
The ASC installation: With the exception of the proposed rear ante-room base vent, I accepted and used ASC’s design recommendation of 26 tube traps of varying diameters along with the ceiling soffit, all traps installed as per the location plan. I always associated tube traps with sidewalls and in general these walls do receive most of the attention, with ceiling often ignored. Yet sound reflects in all directions producing listening abnormalities not only in the horizontal planes (length and width) but in the vertical (height) as well. Art Noxon’s plan treats the ceiling as well as the sidewalls. The ceiling treatment consists of a series of 2’x 2’x 1’ interlocking soffit traps to outline the ceiling area in the front half of the room. Additionally a row of traps was mounted on the ceiling across the room directly above the frontal plane of the speakers. "These components prevent mid-low frequency flutter echo in the plane of speaker, and diminish room reverberation." The ASC goal for my room’s front end was to provide "a clean time-aligned launch wave from speaker to listener."
|
|
The room has three types of traps - the large 16 and 20" in the corners for maximum bass absorption; the smaller 9" for mid/high refection control around the room perimeter; and the ceiling soffit which is an ASC high-end recommendation for rooms with particularly powerful bass speakers where my X-2s certainly qualify. Using theoretical calculations based upon room size and decay rates, ASC can predict the number of traps required, ranging from one trap for each 500ft³ to one trap for 250ft³. My room has 26 tube traps closely fitting this theoretical model.
In an ideal world all elements in the construction process would arrive in sequence and be assembled according to some logical schedule. The bad news was that Murphy's Law ruled and the room was in flux for almost one year. The good news was that I could listen to the room extensively during the various stages of treatment, getting a superb hands-on lesson of the additive effects of acoustic treatments. From untreated bare walls to a top-end finely tuned room, the process gave me a fairly unique perspective on acoustics.
|
 |
 |
The initial room had a few leftover tube traps and diffuser panels from my prior room. As an essentially untreated room, the sound was chaotic, diffuse, boomy and with no discernable soundstage. It was unlistenable as a high-end setup so I won’t waste pixels describing its sound. The next progression was borrowing a slew of ASC sound panels. These are thin attractive 48" x 8" x 2" panels which offer effective absorption down to 200Hz with absorption and diffusion from 400Hz up. These were hung at about 36 places along the walls, ceiling and soffit, making a dramatic improvement in the mids and highs. Hardness and unnatural echo were essentially banished. The sound opened up with far more natural and spacious ambience. By placing the panels at the various reflection points, the room for the first time displayed imaging, low-level resolution, air and a natural presence. The improvement was a quantum leap up from bare walls. As one of ASC’s lowest cost products, one possibly could treat a normal sized room for less than $1.000. What’s the catch then if these are so good? Why spend ten times the amount or much more for a fully trapped room? There are two answers – flexible tuning and bass. In the early chapters I defined the difference between highs and lows. The ray-like nature of highs can be absorbed and treated with a few inches of material. The lowest bass requires absorptive material measuring up to 16 feet thick. Therefore two-inch thick panels do nothing to tame massive bass problems. Even with the panels everything below the midbass was still a messy combination of boom or suckout and devoid of definition and articulation. Sure there was ‘boom-box’ loudness for an artificial impression of bass but it was slow and disjointed compared to the top-end response.
|
|
The second feature the traps bring to a room is amazing adjustability. Not only can you slide them along the walls to easily match the reflection points, rotating them changes the amount of absorption and diffusion. The sonic improvement over the sound panels mirrors the price differential. Sadly there’s no free lunch. Although the sound panels are far superior to bare walls, the tube traps are far superior to the sound panels. Let me offer a subjective scale comparison. With zero equalling a bare room with no treatment and ten being the ultimate custom top-end tube trap design, the sound panels with a few tube traps bring the room to a 6 with modest cost. As with most things in life, getting from a 6 to 9 or 10 will unfortunately cost far more money than getting from 0 to 6. However, the point is clear. You needn’t remortgage the house to dramatically improve your sound. If you can’t afford a fully trapped room, you won’t be sorry with the sound panels.
|
 |
Adjusting the tube traps: Back to the installation. The traps were installed in the locations specified by ASC’s design. Although cylindrical, each tube trap has a front and back with different acoustic purposes – one side absorbs, the other diffuses and reflects. By rotating the tube trap, you can dial in any combination from full absorption to full diffusion to any possible mixture of both. A small silver dot identifies the orientation. Looking at the ASC room design, the dot is indicated on the drawing as the recommended starting orientation. As you might have guessed, installing the traps is only the beginning. The adjustability of the system is infinite and initially overwhelming. You have to start somewhere of course and when adjusting the absorptive/reflective sides of the tube traps, a key step was listening to voices both live and recorded. The beauty is that while you were not present to know all the intricacies of a Heifetz recording, you are familiar with the subtleties and textures of the human voice, especially familiar voices. Having someone talk near your speakers while you sit in the listening chair will teach you a lot about your room. If the voice is clear, clean neutral, without hardness, brightness or echo, you’re well on your way to good sound. But the voice test was just a starting point.
|
 |
Under the experienced guidance of Terry Menacker, the formal adjustment process was broken down into three steps:
- Response: First we were looking for smooth frequency response and solid bass. The traps were moved incrementally to absorb and trap bass resonances.
- Ambiance and air: The second step was to lessen the effects of room boundaries. Now select traps were rotated to point their reflective sides into the room to expand air and ambiance. This process clearly added width and depth to the soundstage. However there is a balance. Too much reflection and the music looses focus and detail. When we got it right, the sonic image snapped into place. Orchestral instruments were simultaneously individually detailed and part of a rich, harmonic, integrated soundstage. When you get to this stage, some level of personal preference sets in.
- Soundstage: Finally, Terry maximized imaging using a recording where instrumental placements were precisely known. The traps were then adjusted to a known soundstage.
|
 |
|
|
|
Over a period of months I made additional subtle tube trap adjustments by ear. The tube trap forest at first is somewhat intimidating. Since each trap can be individually moved and rotated, I had to learn how the movements of the traps impacted the sound. I started with large movements of two symmetrical traps and listened for the change. I then made the same change with only half the movement and listened again, finally with a quarter movement. By repeating this around the room and with careful listening, I was soon able to fine-tune the room by incrementally lessening perceived anomalies. Initially there was slightly too much glare. Rotating the side traps so that the absorbent side faced the listening seat solved the problem. The front traps seem to affect qualities we normally associate with the speakers like imaging and soundstage presentation. The rear traps appear to affect the room’s air, ambiance and how large the room sounds. By rotating the traps behind the speaker you can fine-tune the soundstage and when you get it just right, the image snaps into three dimensions.
|
 |
Although assembled as one monolithic unit, each eight-foot tube trap is really two four-foot traps joined together with a continuous threaded screw. This allows the top half to rotate independently if desired. If really adventurous, you could orient each half of the trap to provide different absorption and reflection patterns between top and bottom. With your ears closer to the floor while sitting, you could add additional absorption on the bottom while mixing in more air and diffusion at the top. To be honest, I have not tried this yet. The time and effort to get the room right was extensive. I’ve stopped to just enjoy the room. Maybe that will be a subject for a future follow up.
|
 |
In the opening chapters I said that this was a report from an end user’s perspective. It’s no secret that at times reviewers get special setup help. A speaker designer might fly across the country and spend days setting up a reviewer’s system. While we could debate the pros and cons of this protocol, in my case the acoustic products were not review samples and the construction costs were my own.
|
|
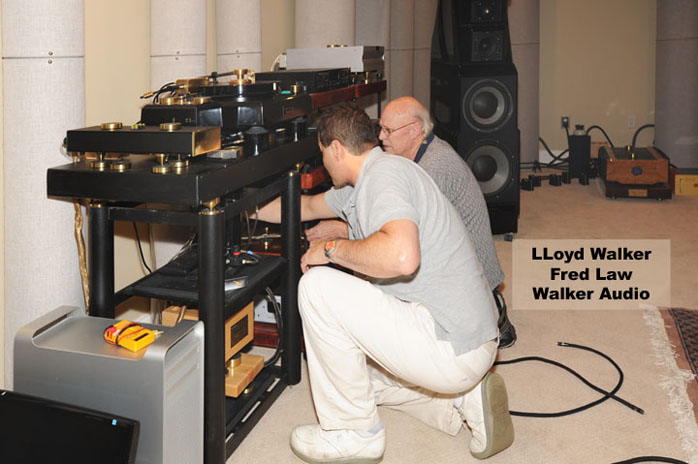
During the processes, I believe that the outstanding help received from both ASC and Overture Audio was representative of the support that would be given to any customer. With that said and in the interest of full disclosure, I did have one day of some additional special tweaking and setup which would not be normally available to the average listener. Due to my relationship and geographical proximity, Lloyd Walker and Fred Law of Walker Audio spent the better part of a day adding their specialized knowledge which brought the system to a new level. Their tweaking plus the addition of the Walker Velocitors, a few Silent Source power cables and hours of meticulous placing of their lead resonance control discs made an already excellent room one major step better. With the room built, assembled and treated, our journey comes to an end in the next chapter where I offer a brief discussion of the final sound. |
|
 |
|