This review page is supported in part by the sponsors whose ad banners are displayed below |
 |
 |
|
 |
Did MDG and Divox record with a second set of stereo mikes above the normal frontal mikes? They could and should have to optimize their 2+2+2 playback. I suppose it’s only natural that they’d beat their chests about it. Strangely enough there’s not one clue on the MDG, Divox or 222 websites about any specific microphone placements. As we know, this has always been the big news for the recording industry since the Decca tree and three-mike/three-channel Mercury Presence and RCA Living Stereo days. Even today 2L of Norway takes pride publishing their multi-channel stage layouts.
|
|
Back to audition. There was no doubt that the MDG recording was superbly done when I listened through normal 2-channel or multi-channel systems. I’d heartily recommend Roman Kofman’s Shostakovich Symphonies Series for instance. But 2+2+2 gave me the feeling of a half-hearted job. First, as a paired subwoofer advocate, music reproduction with one subwoofer is wrong, period. Second, the center channel supposedly is the audio signal picked up by a central microphone. Hearing it coming out from the left is unimaginably awkward. The 2+2+2 recording I listened to was Chopin’s Piano Concertos Nos.1 & 2 [MDG 903 1632] arranged for piano and string quintet. I so did not get the phantom center channel sound image I was supposed to. Instead I kept hearing the violins playing from a balcony on the left. The piano was squashed within a disoriented soundstage. I much prefer 5.2 or 2 + 5.2. Anyhow, it still was reassuring that in the quest for spatial realism, I’m not alone. And I’m glad that I’ve found a more realistic solution that works for me.
|
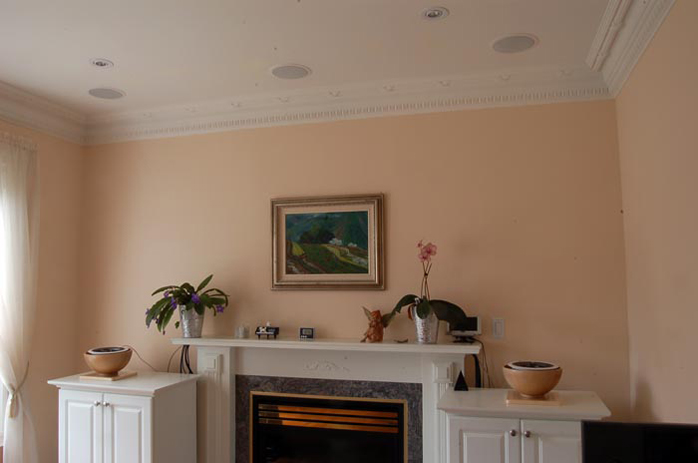 |
Part 3: Start Polking fun. The Polk Audio MC60 didn’t just change my sentiments about in-ceiling speaker. They also opened a new chapter in my hifi book. Although the MC60 is officially retired from the Polk catalogue, Visions in Canada seems to carry abundant stock. One of my friends ordered six for his 7.2 home theater after auditioning mine for front ambience, surround and surround back. Another ordered eight with the extra pair for center channel duty mounted on the front wall on either side of the screen. I ordered eight over the course of ten months for my DIY projects. From what I hear, the MC60 has untapped potential for two-way drivers. First, they sound extremely well balanced. When added to my two existing stereo setups (Apogee Centaur Minor and Mark & Daniel Diamond+) they don’t impose any strong personality to the prevailing spectrum but just enhance overall ambience. When performing solo, their pure unobtrusive persona is very close to Dynaudio. Second, the MC60 places tweeter, woofer and crossover network in one unit. This minimized manual labour and simplified the design of my DIY efforts. Not only that, the alignment of tweeter and woofer is close enough to approximate coaxial or dual-concentric speakers. This should benefit imaging.
|
 |
Everyone knows that the most challenging part for DIY speaker builders is the cabinet. Those blessed with carpentry skills enjoy their labour of love. Those who are not will gladly choose from the many inventories around the world. I tried for something different. First I thought of the cajón, a box-shaped wooden percussion instrument from Peru. A neighbourhood shop called Just Drums carries a good variety of designs and finishes from $100 to $300 each. They should have worked well but I wasn’t intending to spend that kind of money. It also would be sacrilege to cut such beautiful boxes. Instead I bought two wooden salad bowls from Ikea. They looked good but proved too shallow. I thought of finding bigger bowls, adding front baffles and ports but didn’t have much luck. Then I found a wastepaper bin from discount chain Dollarama. The bin is made of very light and thin but resilient plastic which sounded like a toy drum when tapped with my fingers. Its size was a perfect fit for the MC60.
|
 |
I quickly fitted a pair of bins and hooked it up to a Virtue Two.2. Although the bass was not as rich as the in-ceiling speakers, they sounded quite promising considering they weren’t even half finished. The MC60 fired upwards and naturally I placed the bins on my audio cabinet right beneath the in-ceiling speakers. But they sounded better on taller stands so the bottom ‘diaphragm’ of the bins could move more air. I moved them away from the cabinets. I tried various stands from umbrella stands to flower stands, Japanese Ortho Spectrum wood blocks to Mark & Daniel Maximus subwoofers. Eventually I was most pleased with MYOSS DIY stands, with the four dog-ear clamps of the MC60 all tightened to sit on the bins as 0.5" spacers for venting.
|
 |
The most encouraging part of this bin enclosure was that its bottom and circular wall radiated sound waves in sync with the woofer. I checked this with my Galance PC-8 polarity tester. The LED did respond to the testing popping noise when I moved the tester around and under, indicating that the entire bin was alive and kicking. That meant a quasi omni-directional speaker with only two drivers. I decided to add value to the aesthetics and upgrade the materials based on the prototype. I ended up with two classy models, a front firing version with wood-grain melamine front baffle and an upfiring version with extendable stainless steel legs, artificial marble top and base.
|
|
|
|
 |
The front-firing version: Construction was relatively simple. I cut two pieces of 10¾" x 40" x 5/8" white wood-grain melamine boards and finished the edges with similar wood-grain adhesive edge banding. On each board I cut out the round opening required for the MC60 which was then secured in position. Any support or base to stand it up would suffice but I was lucky to have two metal balance weights from some Ikea file cabinets. Each weighs almost 13 pounds but measures only 11¾" x 5½". The three provisional holes (originally predrilled for mounting the weight on the back of the file cabinet) suited my purpose for mounting an aluminum U-track with screws and anchors. The melamine board fitted snugly into the U-track and with metal brackets supporting the back, stood up firmly with approximately 4° to 5° of back tilt. The bin was then fitted onto the back of the front baffle with extra long and extra strong elastic bands. Had it been tightly secured with screws and anchors it would have sounded dead. A pair of gold-plated speaker binding posts were added to the back.
|
 |
The upfiring version: With the right tools, cutting and polishing artificial marble was not as difficult as I first thought but still challenging. My renovation contractor supplied me with loads of surplus artificial marble from a countertop factory. Trimming these irregular shapes into something usable, measurements and cutting had be accurate. The artificial marble looked hard but was quite soft to the saw blade. I used a jig saw with steel blade for the round opening and a multi-cutter precision saw with 85mm carbide-tipped circular blade for straight cuts. I didn’t even need the diamond blade specialized for marble and ceramic tiles. With a random-orbit sander, polishing could not be rushed and care had to be taken so that all edges were bevelled to the same degree. After that I hand-polished the edges with the finest sand paper. The only inconvenience was that I had to work indoors because my backyard was under ten inches of snow. Soon the insides too were covered in the snow of white artificial marble dust. I had to wear a mask throughout and it was a chore to clean up but worth the effort.
|
 |
I had the base slightly bigger than the top, 10¾" square and 10’ square respectively, both trimmed with octagonal corners. Between top and base I had four stainless steel legs extendable from 33" to 37" at 1" increments. The legs stood on Focal stainless steel spikes. Like the front-firing model, this one too was finished with gold-plated binding posts and the bin secured with elastic bands. Unlike the early upfiring prototype, I remodelled the tweeter to stand up. It became front-firing while the woofer remains upfiring. The extendable legs came from shoe racks ($10 on sale) complete with mounting nuts on both ends that happened to fit the screw threads of my Focal spikes. I only had to precision-drill five tiny holes on each leg so that the height was adjustable by changing the position of a size #4 lock screw.
|
 |
|
|
|
What were the similarities and differences in an actual audition? To begin with, the front-firing model sounds more like normal speakers and the upfiring somewhat different from what I’m used to. I’ve made the latter more palatable for myself by standing up the tweeters to fire directly at me. Both models have exceptionally spacious soundstaging due to their quasi omni dispersion. The ‘technical’ difference is that the front-firing model has 360° radiation in a vertical plane that expands the height and width of the soundstage, the upfiring model 360° degrees radiation in a horizontal plane which expands the width and depth of the soundstage. Both models also have 180° radiation from the bottom of the bin. With the front-firing model this helps project depth albeit to a lesser extent. Unlike open baffle dipole designs, the bins act as vented enclosures and exempt themselves from the disadvantages of inefficient sound pressures.
|

|
Which one did I like better? Different strokes for different Polks. It’s really hard for me to choose one. The front-firing model has more focused imaging and instrumental detailing that would appeal to a larger audience. The layering of orchestral ensembles is as good as the Apogee Centaur Minor except, due to the limitation of a small enclosure, LF extension falls slightly short and appears to gently roll off around 55Hz. The upfiring model has the same bass inadequacy which could easily be compensated with a pair of subwoofers. Ambience is the real killer. The atmospheric presence is so airy and natural that it transcends hifi to a musical illusion that can be linked only to live concerts. It breaks all the laws of hifi attributes. It makes me wonder whether performer localization we’ve treasured so much might have grown too pin-point sharp to remain real. Hifi layering is probably too well defined which has different instrumental groups sound like flat panels or detached strata. If you are prepared to trade in hifi attributes for pure musical aura and local analysis for global coherence, energy and density for spontaneity and relaxation, this is for you.
|
 |
Part 4: Rounding up and rounding out. It’s apparent that I am hooked to this new experience and see potential for this bin design in a multi-channel surround system. The front-firing model makes a perfect front pair and the upfiring model should be ideal for rear channels where I returned the tweeters to their original upfiring position. I ordered four more MC60s, two for paired center channels and two for upper front to assimilate even more concert hall realism. I moved to my diagonal room where I used to have four pairs of Loth-X BS1 for similar purposes. I made two more designs for the newly rounded-up Polks. The center pair ended up in flower buckets left over after my wife had planted the hydrangeas in soil. These are special buckets quite unlike most plastic buckets. Made by Proven Winners these have extremely thin but resilient walls that radiate sound waves perhaps more so than the Dollarama bins. The size of the bucket matches the MC60 tailor-made and the rim fits a plastic hanger of a hanging basket, locking the speaker in place. The bottom of the bucket has five small holes for drainage. I threaded a speaker wire through one of these and enlarged the center hole to fit a 4" x 2" resonance port. It helped enhance bass response despite the small bucket size. The tweeters were repositioned to stand up in front-firing mode. The buckets were hung from the ceiling so they could breathe freely.
|
 |
  |
 |