This review page is supported in part by the sponsors whose ad banners are displayed below |
 |
 |
|
 |
Reviewer: David Kan
Financial Interests: click here
Digital Source: Philips CDV770, Deltec Little Bit DAC
Preamp: KingRex Preamp
Power Amp/Integrated Amp: Dared 2A3, KingRex T20
Speakers: Dynaudio Facette, Loth-X BS-1, Klipsch Synergy F2
Cables: Clearaudio Silver Line interconnect, Deltec Black Slink interconnect, OCOS speaker cables by Dynaudio, Aural Symphonic Digital Standard digital cable, Audience Conductor 'e' speaker cables and interconnect, various generic speaker cables and interconnect
Power Cords: Ensemble Powerflux, Symphonic Line Reference, various generic
Power Line Conditioning: Monster Power HTS-1000 Mk II
Room Size: 11' x 18' x 7'/8' opens to 18' x 19' x 7'/8', long wall setup, carpeted concrete slab floor, suspended ceiling and all walls finished with drywall.
Review component retail: C$1,250 DIY kit (120V version with standard RealCaps). Optional upgrades: Kiwame resistors, V-Caps
|
 |
Part 1. Right out of the box the Triode TRK-3488, from head to toe and inside out, didn’t look one bit the kit amp. The packing alone was unthinkably lavish and secure for a kit amp: a triple carton on the outside (the outermost added by Canadian importer VK Music), 55mm foam cradle on the inside. The tubes were already fitted in their sockets, tube cage securely in place. The two power tubes enjoyed VIP—very important parts—treatment with thick foam sleeves for further protection. When I took the amp out of the box, I seriously wondered if Victor Kung had sent me the assembled amp by mistake. Nope. I turned the amp upside down and removed the bottom panel. All the DIY components and wires were bagged separately in a strip of plastic pockets tidily folded and stored inside the chassis. Each pocket was clearly labeled and numbered to correspond to the component’s location on the PCB. One thing nice about packing everything in one piece was that the packing would be reusable for the fully assembled amp.
|
 |
Triode Corporation of Japan or Tri for short was founded by Mr. Junichi Yamazaki in 1996. Being a music lover and audio hobbyist, Yamazaki san changed track from railway engineer to full-time audio designer with his inaugural VP-300BD. That paralleled single-ended integrated amp garnered prestigious awards from Japanese audio circles one short year later. Success bred success and model after model. Yamazaki san gradually established himself as one of the leading tube amp gurus in the land of the rising sun. The TRK-3488 is the company’s 15th year anniversary commemorative special edition. Most companies would have marked the occasion with a top-of-the-line high-ticket limited edition. Triode took everyone by surprise by making it a 'humble' DIY kit instead. To me the designer challenged himself trying to prove two things: (A) craftsmanship can be extended to kits through creative design and quality control and (B), the price/performance ratio can be further enhanced if customers are willing to DIY a bit. Celebrating an anniversary takes a commercial twist for most companies but Triode chose a rather more meaningful way of saying thank you to their customers and inviting them to participate in the joy of amp building. The model number is not hard to decode: TR for Triode, K for kit, 34 for EL-34 and 88 for KT-88. Yes, the kit amp accepts EL-34 or KT-88 with a flick of one switch. No bias recalibration is required.
|
 |
At CND $1.250, the only thing humble is the price. Although the silver aluminum fascia of the factory series changed to hairline-brushed black at still 10mm with matching knobs, the kit looks every inch up-market with the company’s signature glossy Burgundy lacquered chassis and transformer casings. (Compulsory reading: syndicated review by Marja & Henk.) There’s a consistent touch of aesthetic perfection in each corner. Even the insides of the amp are burgundy red. It also keeps the same black hamster tube cage, the gold-plated speaker terminals and RCA input sockets. As confirmed by Yamazaki san, even the power transformer and output transformers are the same as those used in the factory series made with high-quality 6N oxygen-free copper windings and 100% Japanese materials. The power tubes fitted in my review item were EL34 with silk-screened Tri branding. I asked about their origin and the answer was Shuguang (likewise for the input/driver tubes).
|
|
|
Building the amp was very straightforward and simple considering the kit was half finished already. All the knobs, switches, jacks and Alps volume control were already installed and wired. Transformers, choke and tube sockets were also factory installed and almost completely wired except for a few leads connecting the transformers to the PCB and the NFB wires to the speaker binding posts. The electrical fuse was already in the fuse holder of the IEC inlet. (Additionally there are two spare fuses.) The only work left for the DIYer is soldering the components to the PCB, mounting the board to the chassis and connecting the remaining wires to it. That might take away some fun for the seriously solder itchy but for me minimized the risks of non-performance.
|
 |
The factory’s estimates 5 to 6 hours of assembly. I spent 2 hours on the first day just to solder the resistors. That was unacceptably slow for a mere 39 resistors. My excuse? They were upgraded Kiwame units.
|
 |
Unlike the generic stock generic resistors sorted in separate plastic pockets clearly labeled with numbers corresponding to numbered spots on the PCB, I had to hand sort the upgraded resistors that came in a bundle unmarked and unnumbered.
|
 |
Experience taught me that you shouldn’t rush this sort of thing as it is a headache tracing back in case you mess up and solder the wrong value to the wrong spot.
|
 |
I thought I wouldn’t be able to complete the amp on the following day but I did. And in only four hours.
|
 |
Victor’s English translation of the step-by-step assembly instruction was very easy to follow. There were some minor uncertainties in the final part on specific wiring connections but a quick reference to the colored pictures clarified the issues.
|
|
|
The factory-supplied coupling caps are RealCaps. Instead of through-hole soldering, Triode cleverly arranged them to be soldered to gold-plated copper turret posts mounted to the PCB.
|
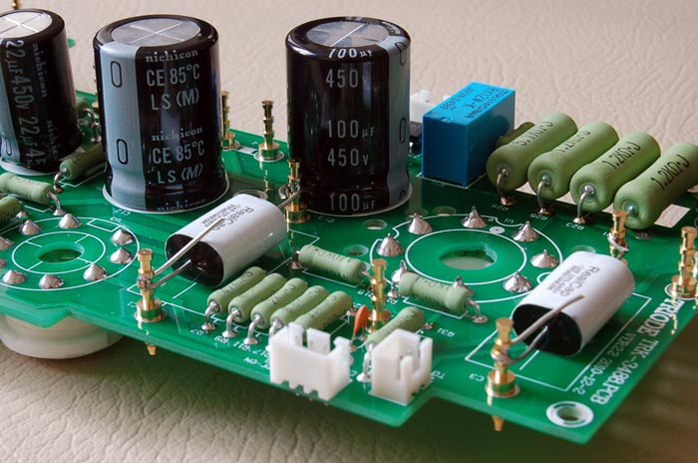 |
Yes I had to mount and solder the pins first but in the future it facilitates cap rolling without having to take out the entire PCB.
|
 |
I’ll simply open the bottom panel and solder.
|
 |
For now I put in the standard Realcaps whilst Victor’s Vitamin-Q caps and copper V-Caps were inbound. Who today would refuse a nutrient boost?
|
 |
|
 |
|
 |
